Category Archives: Nifty and Thrifty

My ever-growing list of domestic ah-has.

Yuletide Treats: California Turtles

california turtles

I grew up in Michigan, the child of typical midwesterners.  My Dad is oft to say pithy things like, “California is the land of fruits and nuts,”  and “Ann Arbor is a little piece of California right here in the midwest.”  Naturally such statements piqued my interest.  So I attended university in Ann Arbor, and shortly after graduation, I moved to California.  Because if there’s two things I like, it’s fruits and nuts (in all connotations of both).  And it turns out that “old dad” was right.

When I got here I spent an entire year being perpetually cold to the bone.  It was strange, but true.  My t’ai chi teacher recommended that I discontinue eating any raw food.  That helped a lot.  So I spent my first year in California snacking on dried fruits and nuts.  During that time I discovered what I still consider to be the ideal fruit and nut pairing:  roasted almonds and golden raisins.

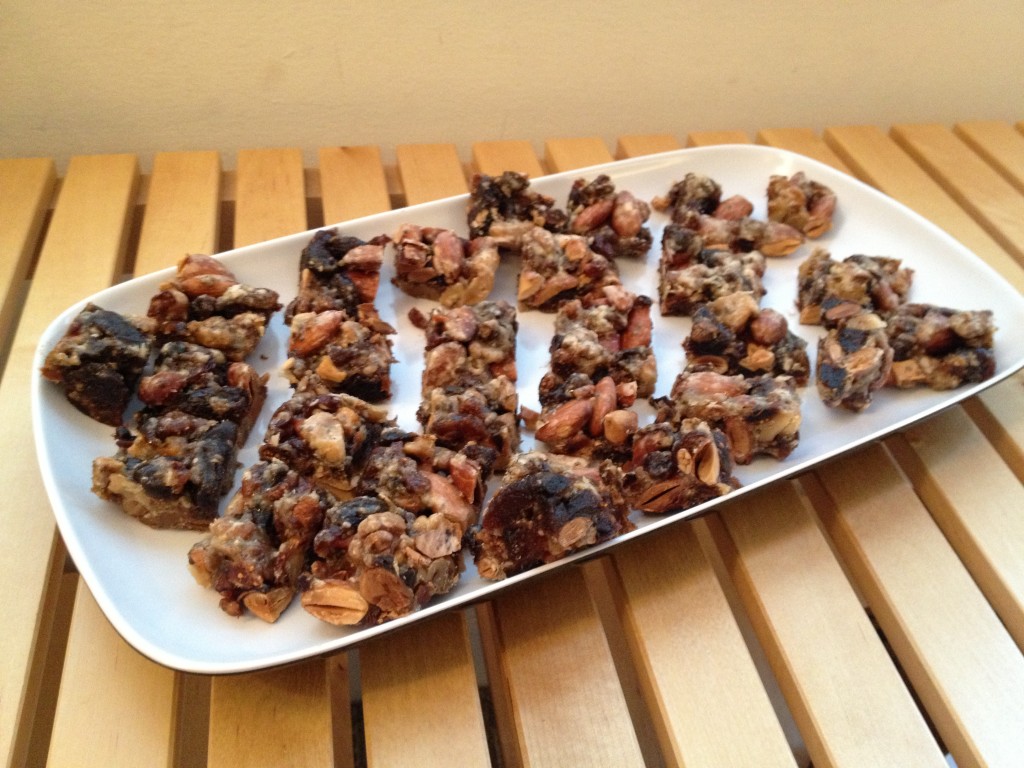
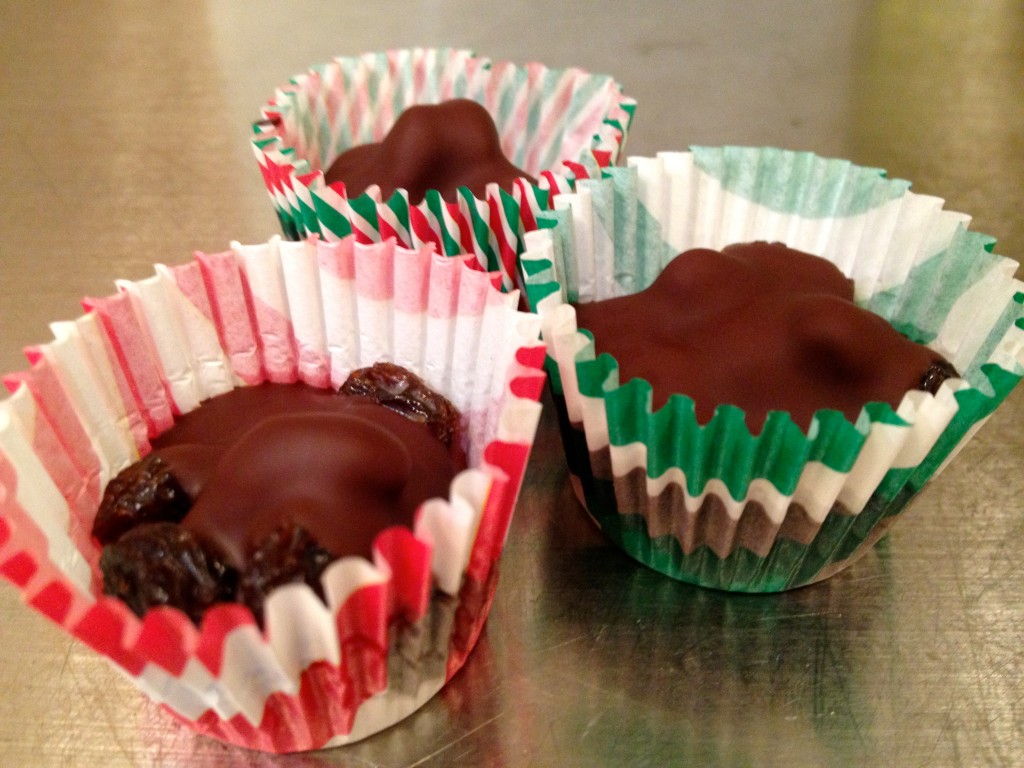
A couple years ago I started making treats for all the people who help me get through my days as a new mom.  I got all sorts of ideas online.  I’m coming up on year three and while I really want to continue the tradition, this year my resources are a bit limited.  So I realized that I’d have to pick just one of my tastily selections to prepare and share.  Given that I’m pretty sure my California Turtles are an original idea and my personal favorite, it seemed obvious which one I should pick.  I love these candies because when I get them just right, the flavors balance beautifully.  The chewy sweet raisins are caramelesque but nutritious too.  The goodness of almonds and dark chocolate are self-evident, I think.

I’m pretty loose when it comes to making things and this year was no exception.  Some of the almonds got a little too roasted.  And most of the turtles were too chocolatey since I opted to use mini cupcake papers and that threw off my proportions.  Also, I used regular raisins since the golden ones were from China and given that I live right here in the land of fruits and nuts, purchasing fruits from a distant continent seems superfluous among other things.  I’m sure that folks will make do with the result (and so far these little tasty treats have indeed been well-received).  Besides, the fact that they were homemade with lots of love and the Brandenburg Concertos playing in the background must count for something.

Here’s How I Make Them
turtles ingredients

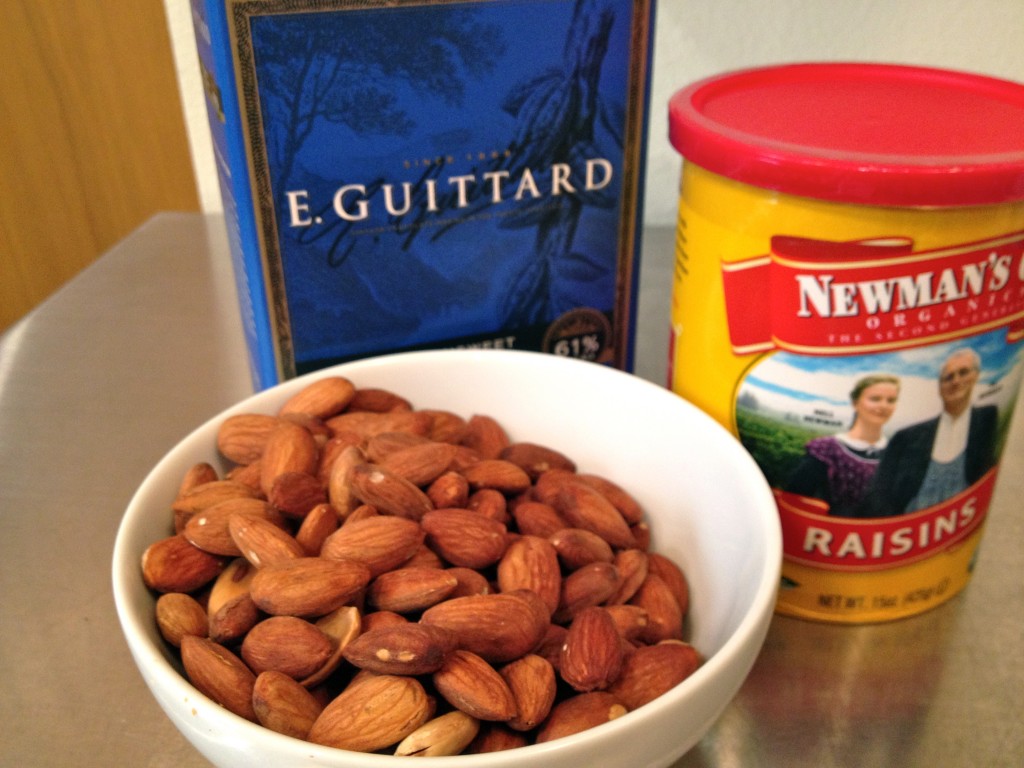
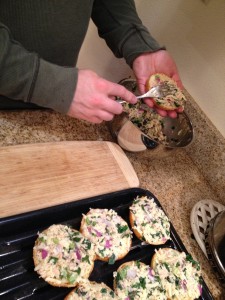
First I soak the almonds to break down the phytic acid and dehydrate them.  Then I roast them.  Then I melt chocolate along with the scrapings of two vanilla beans in a double boiler while I make little piles of three almonds.  When I add the raisins the almonds scatter which makes me realize that I should put them in little cupcake papers.  This contains everything, but somehow gives me the idea that I should put more chocolate than the usual just-enough to keep the little pile together.  I set the candies in the fridge.  Then I wrap them up and deliver them with a smile (and most likely some sort of explanation about their many imperfections).  I regret not sprinkling a bit of celtic sea salt on each candy, but I was out of time…next year perhaps?  Within twenty-four hours, I recall that I have three candy mold sheets that would probably have been perfect for holding the little clusters of fruits and nuts so that I can retain the circumstances that encourage the proper balance of all three flavors that make these California Turtles the perfect homemade confection.

Welcome Yule!

What a Batch of Gluten Free Pancakes Taught Me

gluten free pancakes

On a recent morning my boy and I were embarking on a new phase of our life together.  Since one of our nannies has moved on we have more time together.  This is mostly fun for both of us.  But as is typical of transitions there were some challenging moments when my patience was thin and when my boy’s change in routine was frustrating for him.  It was in the midst of one such moment that my suggestion of making pancakes for breakfast was enthusiastically received.  From the onset, I thought of mashing up a banana since it was the best fruit that we had on hand and I’ve come to think that pancakes with fruit are extra special.  It wasn’t until I’d gathered nearly all the grains out of the fridge that I realized we were out of flour.  All-purpose flour, that is.  We had buckwheat flour, oat flour, almond meal, and corn flour on hand.  After a frantic moment of regrouping I realized that we had what we needed for pancakes even with that omission.

The mixing involved more of frustration on both our parts, but we got the job done.  Seeing the cakes on the griddle reminded me of a character in a since-returned library book that my son really loved, I made the mistake of mentioning it.  The immediate inaccessibility of the book initiated another meltdown.  And an idea.  We headed to the bookshelf and my son selected a book to read.  We pulled the beanbag chair into the kitchen and enjoyed another family favorite while the cakes browned to perfection.

Aside from a full belly, I came away with three good lessons:  how to make tasty gluten-free pancakes on the spot, that mashed banana makes an excellent pancake ingredient, and that taking a break to read a good book makes for perfectly cooked pancakes.  All that in 30 or so minutes.  This kid sure does pack in the lessons!

Here’s the recipe that we ended up with.  The original came from the Joy of Cooking.

Dry ingredients:

  • 1 1/3 cup buckwheat flour
  • 1/3 cup corn flour
  • 1/3 cup almond meal
  • 1/3 cup oat flour
  • 2T coconut sugar
  • 2t baking powder
  • 1t salt
  • 1/2 baking soda
  • 1/2t cinnamon
  • a sprinkle of nutmeg

Wet ingredients:

  • 4T melted butter
  • 1 mashed banana (minus a baby bite)
  • 1 3/4 cup milk
  • 3 eggs
  • 1t vanilla extract

Heat Griddle.
Whisk dry ingredients.  Mix banana and butter.  Whisk eggs, milk, and vanilla.  Whisk banana and butter with other wet ingredients.  Combine everything.  Add fat of choice to griddle (in lieu of our usual butter, I used coconut oil with excellent results).  Using a ladle or a 1/4 measuring cup, slowly pour the batter onto the griddle coaxing it into a round shape.  Wait until the tell tale bubbles have popped before flipping your cake.  If your stove is like mine you may have to shift your cakes around to get them evenly browned.  Enjoy a good read and then enjoy your pancakes.  These were so filling that we had lots of leftovers for future breakfasts.

Auntie’s Chocolate Mint Squares

chocolate mint squares

These are dangerously delicious.  Which is to say that they are not very nutritious and highly addictive.  For these reasons, I make them once a year to share.  When I met my husband, I stopped going home to Michigan for Christmas.  These mint squares are part of the traditions from my youth that I knew had to continue on with me as we built new traditions in California.  I got in touch with my great aunt who made them without fail every year, and I was in business.

First Layer
½ cup butter, softened
1 cup sugar
4 eggs
1 cup flour
½ tsp salt
1 tsp vanilla
1 ½ cups chocolate syrup

Preheat oven to 350 degrees.
Combine butter, sugar, and eggs with an electric mixer.  Mix in flour, salt, vanilla, and chocolate syrup until you have a silky batter.  Pour into an ungreased 9×13 glass pan.
Bake for 30 minutes.  Cool overnight.

Second Layer
½ cup butter, softened
2 cups powdered sugar
a dash of mint extract, to your taste.  (use either mint extract from the spices area of your market, or food grade peppermint essential oil)

Combine butter, powdered sugar and mint with mixer.  Spread over cooled cake.  Chill until firm.

Third Layer
6 oz semisweet chocolate chips
6 TBS butter

Melt chocolate chips and butter, stirring until silky and completely combined.  Pour over top.  Refrigerate to cool.

Once cooled and set, bring to room temperature.  Cut into 1 inch squares.  Dipping the knife periodically in clean water makes clean cuts (messy cuts mean nibbles for the person slicing though – your choice).  The squares freeze and thaw nicely, just wrap them really well.

Dried Fruitcake: Delicious and Nutritious

dried fruitcake

As promised…
A client brought this tasty loaf to me many winters ago.  I fell in love with it and asked for the recipe.  My husband and I love to slice it very thinly and toast it with butter.  It is mostly fruits and nuts, the minimal amount of batter just holds it all together.

1 cup dried dates, chopped (the oat coated date pieces are a dream after pitting and chopping your own a couple times)
2 cups apricots, chopped
1 cup raisins (golden if you like)
1 ½ cups whole blanched almonds
1 ½ cups walnut pieces
¾ cup sugar
¾ cup flour
½ tsp baking powder
3 eggs
1 tsp vanilla

Preheat oven to 300 degrees.
Mix the fruit and nuts.  Mix the flour, sugar, eggs, vanilla, and baking powder.  Combine everything.  Bake in a buttered loaf pan for 2 hours.  I check the loaf periodically to ensure that the top isn’t burning (I think that this depends on one’s oven because it wasn’t always a concern).  It can be covered with aluminum foil.  I have also taken to baking in cupcake tins since the baking time is shorter and the smaller cakes are easier to manage.  I’m afraid that I don’t have a baking time for the cupcake size.  I just check frequently.  It’s done when the cakes come out of the pan easily after a little coaxing with a spatula around the edges, the color is golden, and the consistency is firmly together.

A Surplus of Cucumbers and Lemons

I realize that this particular situation most probably only happens in certain places.  Here in Oakland, we have lots and lots of lemon trees.  It was one of my first discoveries about this city upon moving here and one of the things that I love most about it.  One small indication of the ways in which the Oakland lifestyle is imbued with practicality.

Our neighbors have a lovely backyard garden and they are frequently sharing its bounty with us.  Last night we came home with cucumbers, lemons, zucchini, and tomatoes.  I’ve been hearing variations on using the whole lemon for tonics lately and so I decided to make one of my own.  Everybody in the house agreed (excepting the cat), that it was a tasty creation.  And it was pretty healthy too!

Lemon-Cucumber Cooler:  Combine the following ingredients in your high powered blender until you have a nice smooth beverage.

  • Equal parts cucumber and Lemon (this will depend on your specimens).  I cut out the seeds of each, but otherwise left them complete with skins.
  • Enough water to make your cooler mostly liquid, rather than a smoothie.
  • Honey or maple syrup for sweetness (local, raw honey will add to the healthy benefits)

Here’s to healthy summer eating and friendly neighbors sharing!


Celebration Time, Come On!

We just finished up celebrating our son’s second trip around the sun and given how many party attendees requested recipes from our food offerings, I thought that a little sharing for posterity’s sake was in order.

Homemade Birthday Banner

garden view garland P1010701 leafy garland

I completed our set of birthday garlands for last year’s first birthday celebration.  Much to my surprise, I made many more yards than I’d intended.  My husband assured me that this was a good thing since we are partial to parties in parks.  Now that our neighborhood tot lot is the ideal setting for our son’s enjoyment, we are armed with plenty of decorations (thankfully this relieves me of the sense of obligation to make more).  Our adornments made our favorite park a little more special in honor of our little guy and his favorite friends.

Menu

I was determined to provide healthy snacks that I’d be more than happy to feed my kid for our party.  Considering, my limited time, the constraints of an outdoor party in the heat, and the variety of dietary constraints that many live with, I put together a menu with the hopes that each person in attendance could enjoy at least one thing.  The combination of food allergies is tricky to navigate, but I think that I at least achieved part of what I set out to.

Here are the recipes and links (in italics) to the originals when applicable.

Mango Cashew Sunshine Bites  – my changes are recorded here

  • 2/3 cup cashews
  • 1 cup dried mango
  • 1/2 cup coconut (plus more for garnish)
  • 1 cup Harmless Harvest coconut water (the best tasting that I’ve ever had, this coconut water is raw and delicious)
  • 1/4 cup raw coconut butter
  • 2 tsp honey
  • seeds of one vanilla bean
  • orange zest
  • pinch of red salt
  • pinch of turmeric 
  1. Soak Cashews in salted water for six hours.  Drain and Rinse.
  2. Soak mango and coconut in coconut water for 30 minutes.  Retain any excess liquid.
  3. Place all contents in food processor and process until a silky smooth paste is al that is left of the ingredients.
  4. In preparation for rolling the balls, coat hands with coconut oil.  Spoon out 1/2 teaspoons of the mixture at a time, roll into a ball and coat with coconut flakes.
  5. Store in the refrigerator for up to two weeks.

Chewy Granola Bites again, my changes are recorded here

  • 2 Tbsp chia seeds in 6 Tbsp of water (could use Harmless Harvest, this is only occurring to me now)
  • 2 cups rolled oats
  • 1/2 cup raw buckwheat groats
  • 3/4 pecans
  • 1 cup dried white figs
  • 1/4 cup coconut oil
  • 1/3 cup maple syrup
  • scraped seeds of 1 vanilla bean
  • 2 ripe bananas
  • 1/2 tsp red salt 

(Before preparing this, I soaked the oats, groats, and pecans according to the specifications of Sally Fallon and dehydrated them.)

  1. Combine chia seeds and water.  Set aside.  A gel will soon form.
  2. Toast oats, groats, and nuts in a 300 degree oven for 15 minutes.  Check and stir every 5 minutes to prevent burning.
  3. Mix coconut oil, syrup, and vanilla.  Add a little heat if necessary to turn the oil to liquid form.
  4. Use a food processor to blend the bananas and the oil mixture until it is smooth.  Then add the chia gel with only a quick pulse to incorporate.
  5. In a large bowl combine the toasted oats, groats, and nuts, the liquid mixture, and the figs.
  6. Chose a pan based on how thick or thin you’d like your bars to be.  Line with parchment paper.
  7. Bake in a 350 degree oven for 25-30 minutes (but do bear in mind the thickness of your bars when choosing the length of time before checking in to prevent any burning.)
  8. Allow to cool in pan for at least 30 minutes.
  9. Make use of the parchment for removing from pan.  Cut or crumble as you like.  (The cooler and thicker the bars, the more likely that they will actually be bars.  Mine were too warm and too thin to be bars when I started to cut.  So they became tasty granola bites instead.)
  10. Store in the refrigerator for up to two weeks.  The coolness helps to ensure that they hold their shape.

Quinoa Salad
The original recipe comes from a little cookbook that my mom gave me years ago when I was a vegetarian in college.  The little book is long gone, but this one favorite recipe has remained something of a staple for me.

  • 2 cups cooked quinoa (I soaked mine first and then added too much cooking water so it was sort of mushy, but definitely nutritious)
  • 1 bunch of Italian parsley’s leaves chopped very finely
  • 1 box of mini tomatoes, halved
  • 1 cucumber, quartered lengthwise and sliced
  • 1 lemon, juiced (I learned this method from my Cypriot friend:  halve the lemon, then put a fork in the sections of each halve.  Squeeze while moving the fork up and down until you are satisfied with the amount of juice extracted.  Simple.  And do take advantage of the oils from the peel as they naturally come off on your hand in the process, they make a lovely salve.)
  • Olive oil and red salt to your taste.

Sachertorte – From The Frog Commissary Cookbook
CAKE INGREDIENTS

  • 8 oz semisweet chocolate (the good stuff.  Valrhona, for example.)
  • 8 oz unsalted butter, softened
  • 1 cup coconut palm sugar
  • 3/4 tsp red salt
  • 2 tsp vanilla extract (in our house we always put a bit more for good measure)
  • 1/3 cup buckwheat flour
  • 8 oz crispy walnuts ground to a fine powder in a nut mill.
  • 8 egg yolks
  • 8 egg whites

ICING INGREDIENTS

  • 2/3 cup apricot jam (I found an all organic variety sweetened with apple juice, score!)
  • 1/2 cup heavy cream
  • 6 oz semisweet chocolate (the same stuff you used in the cake), chopped
  1. Butter and flour a 9″ by 2 1/2″ springform pan.
  2. Preheat oven to 350 degrees.
  3. Melt the chocolate in a double boiler.  Cool to lukewarm.
  4. Cream the butter with the salt, vanilla, and sugar.
  5. Toss the walnuts and flour.
  6. Add the egg yolks one by one to the butter-sugar mixture.
  7. Stir in the chocolate and nuts.
  8. Beat the egg whites until soft peaks form.
  9. Stir 1/4 of the whites into the chocolate mixture to lighten it up.
  10. Fold in the remaining egg whites.
  11. Pour the batter into the prepared pan.  Bake 1 hour.
  12. Cool in pan for 20 minutes.  Then flip onto a cooling rack and remove the bottom.  Cool completely.

(The Frog describes how to properly ice the cake.  I chose not to put time into such things, so I take a simpler approach, which ends in a rather funny looking cake that is just as tasty as its prettier counterpart.)

  1. Place the cake on your serving plate of choice.
  2. Spread jam over top and down the sides of the cake.  Place in the refrigerator to set the jam.
  3. Carefully heat the cream so that it will be sufficiently warm to melt the chocolate.  (Don’t let it boil or burn).
  4. Stir chocolate and cream together until the mixture is completely smooth.
  5. Allow to cool till just warm enough for spreading.
  6. Pour the chocolate over the cake taking care to distribute evenly on the top and down the sides.
  7. Chocolate will pool up around base of the cake.  (Clearly the thing to do is use a spatula to wipe it up and then use your mouth to enjoy the evidence of your lack of skill in cake decorating.  Depending on how long you wait to serve the cake, you may have to repeat this step.)
  8. You can carefully freeze this cake.  First on a plate, then wrap carefully and extensively once frozen.
  9. Or you can refrigerate for a couple days before serving if you are doing a lot of cooking, say for a birthday party.

Banana Cupcakes with Maple-Coconut Cream Cheese frosting – adapted from an adaptation of The Silver Palate Cookbook

The truth is that my husband made this cake and frosting.  I provided him with a recipe and then he did more research.  I don’t really know what he did.  I’ll leave you with the links and the changes that I know were made.

  • Yogurt was substituted for buttermilk
  • 1/2 cup coconut palm sugar and 1/2 cup of maple sugar was used in place of the sugar (which is missing from Helen Jane’s recipe all together.)
  • In the frosting, maple syrup was the only sweetener used.  A little less butter was used, and shredded coconut was added on account of the liquid sweetener form.  Cupcakes were topped with coconut and an umbrella for tropical whimsy.

Cucumber / Lemon Water
This is simple and yet, surprisingly satisfying.  I washed and cut up three little cucumbers and an entire lemon (skins on, seeds out) and plopped them in our five gallon water bottle which we put on the crock at the park.  While we had a couple gallons left at party’s end, I was happy to see that so much had been consumed on such a hot day.  And happier still to know that I avoided sugary juices and drinks all together.


There may very well be errors here.  Use your best judgement and let me know.  A little editing is all it takes to make most things right.

Twists’ Tasty Tuna Melts: Our Family Recipe

tuna melts

My husband’s mom bears the credit for this tasty meal.  It is probably his most common response to the not so often asked question, “what shall we have for dinner?”  (I usually just figure it out.)  And it may possibly be the most commonly shared recipe by request.  Since I just texted a version today, I thought that putting it down for posterity’s sake may be enjoyable for others and serve as a future time savings account for myself.

A big part of what I enjoy about food is texture.  For example, I’ve always loved salad, but until I learned how to slice lettuce super thinly from my Cypriot friend, I was always put off by chewing on big cumbersome leaves once I’d managed to get them in my mouth while leaving a trail of dressing all over my face.  The first time I watched him prepare the salad, I was intrigued, but when I partook:  I was in heaven.  (I believe that he offered up some combination of red leaf, mint, tomato, olive oil, and salt.  And since I’m on the topic, I’ve still found nothing to beat green cabbage which is left to soften in a simple dressing of lemon juice and salt.  Delicious and Nutritious!).  There I went digressing…

The point of the texture diversion is that these tuna melts are the perfect embodiment of texture done well.  Each bite includes a tasty balance of all the flavors, none over taking another.  And there’s no big slab of greasy cheese to navigate and get sort of grossed out over.

Now, I realize that tuna is one of those edibles to be consumed with caution.  And we do.  We opt for Vital Choice tuna because it has all sorts of great qualities.

I realize that this blog is sparse on photos in sharp contrast to lots of others out there.  But I’m confident that readers will be able to sort this all out with just the above visual aide.  And while your enthusiasm may not be as heightened without some beautiful photos to drool over, hopefully your imagination will fill in the blanks till you have the real thing on your dinner plate.  Enjoy!

Twist’s Tasty Tuna Melts

  • Tuna
  • Shredded cheese of your choice (we use cheddar)
  • Finely chopped red onion
  • Finely chopped celery
  • Finely chopped greens (we use blanched kale or chard)
  • Cayenne pepper (optional)
  • Just enough mayonnaise to hold it all together (this is what my husband told me many moons ago.  The truth is that the binding really comes from the melted cheese which will happen in the oven.  Which is all to say that you really don’t need too much mayo at all.)
  • Light, fluffy buns which are mostly air (my husband’s explanation for why he can consume so many).  Alternately, brioche buns work well.  And if you’ve never had either of the two listed, you’d probably be perfectly happy with your family’s bread of choice for toast, it’s just that once you’ve tried either of the first two options, you may experience a shift in standards.

I leave it to you to sort out the balance of ingredients.  Should you make too much, have no fear.  Store in the fridge for lunch the next day.  I do not recommend making too little, resentments may result.

Mix the topping together.

Use a fork to press the topping onto your pieces of bread (Buns halved if that’s what you are using.  Press on to the inner side, sorry if that was obvious.  I certainly didn’t mean to insult your intelligence, maybe I should just have pictures…..)  This takes a little practice, as you don’t want so much topping that it doesn’t cook all the way through.  Nor do you want so little that you have mostly bread.  The fork is important because you use it to sort of press it onto the bread and (maybe this is where the mayo comes in) in that way it all sort of stays put.

Place under a broiler and watch carefully.  When the tops are golden brown you are ready to tuck in and enjoy.

A Nursing Mama Tip

A while back one of my clients told me what she did during her nursing days to keep her tummy private. And today, I decided that the time to share has arrived.

You take a long and easy cotton tank top (men’s undershirts work well) and cut out the bosom area. Then you layer your undershirt between your nursing bra and your regular shirt. If you wear exclusively nursing clothing, then this isn’t really necessary, but as the months wear on, I’m pretty sure that I’m not the only person dipping back into my regular old clothes.  And it sure is more comfortable to nurse without being conscious of the fact that my flubbits are on display.

Here are the photos to prove what a good idea this is. Happy altering!

In order to avoid this:P1010583

Get this:

P1010587

P1010588

Now, doesn’t that feel better?

My California Winter Freeze

what's in my freezer

It should come as no surprise that I’m late in getting this post written up. As I’m new to this blogging business, my writing schedule is still sporadic. But as I anticipated, it is yielding excellent results for me and my sanity. My pint-size companion is in the midst of a crest of disequilibrium (and we think teething pain) this week and so I can use these little spots of time with my fingers clicking away at the keys all the more.

I’m late to publish because we are already about a month into eating out of the freezer. Clearly storing foods for the winter is a thrifty thing to do and a healthier alternative to eating foods that are grown and then flown, but I wanted to share my ideas for freezing just in case I’ve also got at least one novelly nifty item on my list as well. Items are therefore ordered accordingly.

Hate garlic breath? Me too. Since we get a CSA box, I get more garlic than I’m inclined to use on account of the resulting stink. But it dawned on me that I could take full advantage of parsley’s miraculously anti-garlic-stink properties. So, when I get a head of garlic, I also get a bunch of parsley, then I remove the stems and skins, rinse, and process in our mini cuisinart. I portion the mixture into plastic sandwich bags (I must find a greener alternative…) and plop them in the freezer. Then I’ve got flavor at the ready without the unfortunate aftermath. For example…

Tonight’s dinner is almost completely from the freezer:

Eggplant parmigiana patties (prepared back when we got a lot of eggplants in the box), slathered in TSH marinara sauce (which I purchase when available for just this sort of purpose) and mozzarella (okay, I’ll pick that up at the market today along with a loaf of bread) for garlic bread (with parsley, of course).

Orange and Lemon zest. When zesting, why not go all the way and put the extra bits in a baggie for later? Waste not, want not.

Roasted peppers. Around October is the optimal time to gather up a lovely variety of peppers at our local farmers’ market. I roast them and remove the skins. Then I chop them up into strips and portion them into baggies. I use them in all sorts of dishes through the following months. A far thriftier and healthier way to enjoy roasted peppers than purchasing them in pricy jars.

Tomatoes. I know, I know, everybody’s got their way of putting tomatoes up. I’ve tried a few. For now, this way is the best for me. I purchase a couple boxes from our favorite farm, rinse, bag, and freeze. When the tomatoes thaw, the water naturally separates and the skins fall off with minimal effort. Real. Simple.

Herbs in the freezer: basil and sage. Sage on account of the fact that I can’t seem to find away to get it completely dry with air alone and basil because my husband’s favorite way to cook carrots involves fresh basil and so frozen fresh is better than dried.

Blackberries in freezer. We take an annual trip up to a nearby town that is bursting with wild blackberries. We fill every container that will fit in our car with the delicate fruits of our labors. Because my husband can’t tolerate seeds, we run the rinsed berries through a food mill. In the past we’ve made jam, but this year on account of limited time, we just poured the puree into ice cube trays, froze, and then plunked them into (you guessed it) a plastic bag. We take the seed pulp and boil it up with sugar and water to make a tasty syrup for waffles or pancakes.

Lemon juice at the ready. We have many friends with lemon trees which I think is just wonderful given my love of lemon juice (I have to hold back on putting it in just about everything I cook, because my husband does not share my opinion). When we receive a bag of gifted lemons, we juice them and freeze the juice in ice cube trays and then we put them in plastic bags.

Summer rhubarb sauce. Last year when I had a very small baby to care for and a frequent sense of overwhelm to navigate, my father-in-law showered us with rhubarb from his garden. I was not pleased. Surprisingly, my husband welcomed the gift and put 4 full freezer bags in the freezer. For later. The thing is that later for my husband is waaaay later than it is for me. The kind of later that may never happen. Lucky for me, I stumbled across this recipe and now it follows, that since our source didn’t deliver this year, I was searching for rhubarb at the farmers market so that when February comes along I will be able to satisfy a particular craving.

Aside from the use of plastic bags in the freezer, which we do wash and reuse, by the way; we make use of quart and pint sized yogurt containers for freezing foods. Generally speaking, when I cook something, I cook enough for dinner, lunch the next day, and a couple meals worth for the freezer. This keeps me from having to spend each and every day cooking in the kitchen save for preparatory work.

Here’s a list of the meals that our freezer currently contains with links to their online recipes when available:

goulash, red bean chili, white beans, stuffed cabbage, minestrone soup, and butternut squash lasagna.

Clearly, a full freezer is the only way that I feel comfortable starting the winter. Although, it’s only fair to admit that these days in Oakland feel more like summer (sorry to point this out to those who currently are shivering in their seats). It would seem that my California freeze is contained to a rather small box in my kitchen. And I’m okay with that.


Introducing…Nifty and Thrifty

This is my ever-growing list of domestic ah-has, tricks for eating healthy with a busy schedule, and increasing my around-the-house efficiency.

Today I bring you my current way to enjoy a quick and nourishing warm breakfast. While my husband is a sweet-in-the-morning kind of guy, I need to start my days with a solid protein-rich foundation. Eggs are my most reliable morning food. I am very happy to be able to get pasture raised eggs from a variety of sources here in the SF bay area. Clearly I wasn’t the only one to read this book a few years back and so now we have a healthy supply of omega-rich eggs here in our little slice of the globe.

If I’m on my game, once a week I prepare a frittata which I then portion out into seven slices. That way all I have to do is pop it in the toaster oven and I’ve got a healthy breakfast all ready to go. Here’s my (very loose) formula. Obviously there are LOTS of frittata recipes out there. It seems silly to go into too much detail given that I’m not an experienced recipe writer.

Whisk together in a mixing bowl:

however many eggs you’ll eat for breakfast in 7 days.

Some other good stuff, for example: salt and pepper, herbs of choice, finely chopped and lightly cooked veggies of any kind (so that they don’t over cook with the baking and reheating but aren’t raw for the eating), milk, plain yogurt, cream, cheese, you get the idea. (This is a great way to use up something that would otherwise go to waste.)

Warm up a big (size depending on how much you’ve got, but it’s best if it has a lid) pan over low heat with some olive oil, butter or your choice of lubricant.

Pour in the mixture, cover, and leave to cook slowly. This may take a while. It’s done when there’s no more liquid. You can turn on your broiler and brown the top. But since you’re going to reheat in the toaster oven, this isn’t really necessary.

Allow to cool completely. Cut into wedges. Put in the fridge.

Now you’ve got a delicious and nutritious breakfast just waiting for you every day.  Isn’t that nice?

frittata