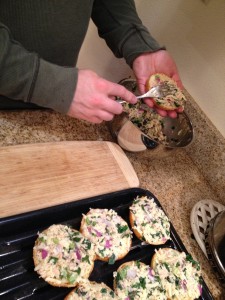
My husband’s mom bears the credit for this tasty meal. It is probably his most common response to the not so often asked question, “what shall we have for dinner?” (I usually just figure it out.) And it may possibly be the most commonly shared recipe by request. Since I just texted a version today, I thought that putting it down for posterity’s sake may be enjoyable for others and serve as a future time savings account for myself.
A big part of what I enjoy about food is texture. For example, I’ve always loved salad, but until I learned how to slice lettuce super thinly from my Cypriot friend, I was always put off by chewing on big cumbersome leaves once I’d managed to get them in my mouth while leaving a trail of dressing all over my face. The first time I watched him prepare the salad, I was intrigued, but when I partook: I was in heaven. (I believe that he offered up some combination of red leaf, mint, tomato, olive oil, and salt. And since I’m on the topic, I’ve still found nothing to beat green cabbage which is left to soften in a simple dressing of lemon juice and salt. Delicious and Nutritious!). There I went digressing…
The point of the texture diversion is that these tuna melts are the perfect embodiment of texture done well. Each bite includes a tasty balance of all the flavors, none over taking another. And there’s no big slab of greasy cheese to navigate and get sort of grossed out over.
Now, I realize that tuna is one of those edibles to be consumed with caution. And we do. We opt for Vital Choice tuna because it has all sorts of great qualities.
I realize that this blog is sparse on photos in sharp contrast to lots of others out there. But I’m confident that readers will be able to sort this all out with just the above visual aide. And while your enthusiasm may not be as heightened without some beautiful photos to drool over, hopefully your imagination will fill in the blanks till you have the real thing on your dinner plate. Enjoy!
Twist’s Tasty Tuna Melts
- Tuna
- Shredded cheese of your choice (we use cheddar)
- Finely chopped red onion
- Finely chopped celery
- Finely chopped greens (we use blanched kale or chard)
- Cayenne pepper (optional)
- Just enough mayonnaise to hold it all together (this is what my husband told me many moons ago. The truth is that the binding really comes from the melted cheese which will happen in the oven. Which is all to say that you really don’t need too much mayo at all.)
- Light, fluffy buns which are mostly air (my husband’s explanation for why he can consume so many). Alternately, brioche buns work well. And if you’ve never had either of the two listed, you’d probably be perfectly happy with your family’s bread of choice for toast, it’s just that once you’ve tried either of the first two options, you may experience a shift in standards.
I leave it to you to sort out the balance of ingredients. Should you make too much, have no fear. Store in the fridge for lunch the next day. I do not recommend making too little, resentments may result.
Mix the topping together.
Use a fork to press the topping onto your pieces of bread (Buns halved if that’s what you are using. Press on to the inner side, sorry if that was obvious. I certainly didn’t mean to insult your intelligence, maybe I should just have pictures…..) This takes a little practice, as you don’t want so much topping that it doesn’t cook all the way through. Nor do you want so little that you have mostly bread. The fork is important because you use it to sort of press it onto the bread and (maybe this is where the mayo comes in) in that way it all sort of stays put.
Place under a broiler and watch carefully. When the tops are golden brown you are ready to tuck in and enjoy.